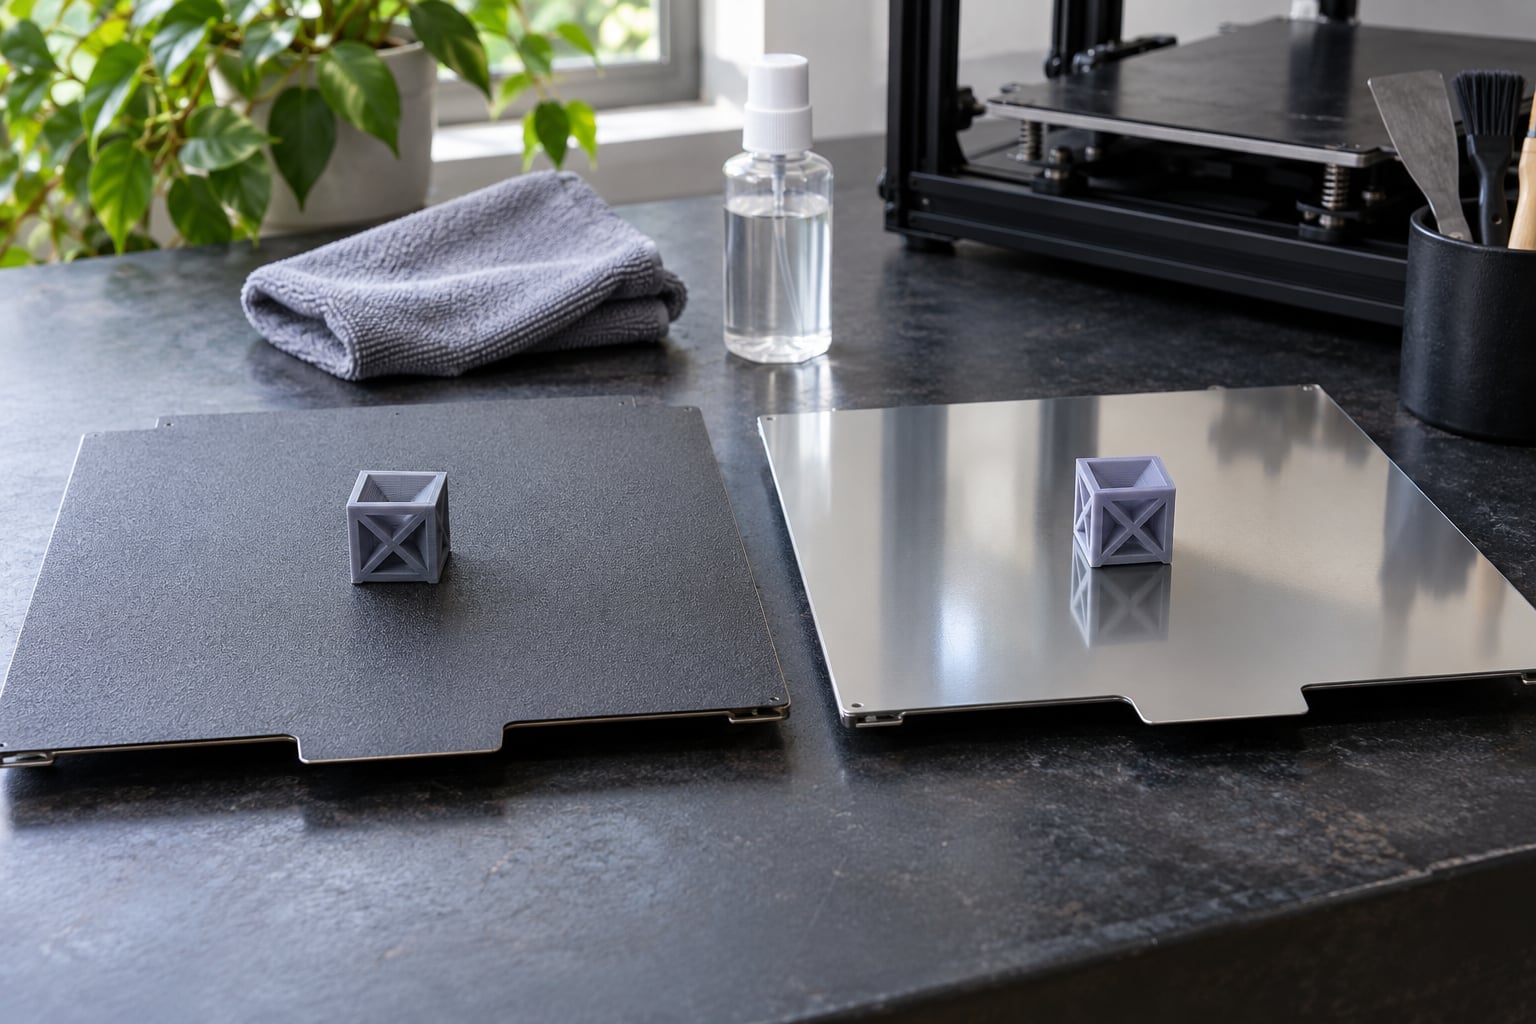
The textured vs smooth build plate differences come down to one coating. Both plates are the same magnetic spring-steel platform, but the textured one carries a powder-coated PEI layer with a matte stipple that grips mechanically, while the smooth one has an uncoated glossy PEI sheet that grips chemically. Textured wins on adhesion and forgiveness. Smooth wins on the underside finish.
If you are new to FDM and just want prints to stick, start textured. If you print display pieces face-down, glue parts together, or want a glossy base on vase-mode parts, the smooth plate earns its second slot. Most people who print regularly end up owning both.
Table of Contents
- 1Textured vs Smooth Build Plate Differences at a Glance
- 2How Build Plate Texture Changes First-Layer Adhesion
- 3Signs your first layer is failing on one plate but not the other
- 4Do You Need to Re-Calibrate After Switching Plates?
- 5Surface Finish and Print Quality
- 6Printing Face-Down: Mating Surfaces and Glue-Ups
- 7Warping, Curling, and Heat Performance
- 8Which Materials Work Best with Each Plate?
- 9PLA on textured versus smooth
- 10PETG: where vendor guides and users disagree
- 11TPU, ABS/ASA and engineering filaments
- 12The plate-to-filament matrix
- 13The third option beyond textured and smooth
- 14Do Textured and Smooth Plates Need Different Slicer Settings?
- 15Cleaning, Maintenance, and Plate Lifespan
- 16Cleaning method by surface
- 17Which Should You Choose?
- 18Frequently Asked Questions
- 19What are the key differences between smooth and textured build plates for 3D printing?
- 20Does PLA stick to textured PEI without glue?
- 21Is a textured PEI plate good for PETG?
- 22Do textured PEI plates wear out and how long do they last?
- 23Can I print TPU on a textured PEI plate and does it need glue?
- 24Conclusion
Textured vs Smooth Build Plate Differences at a Glance
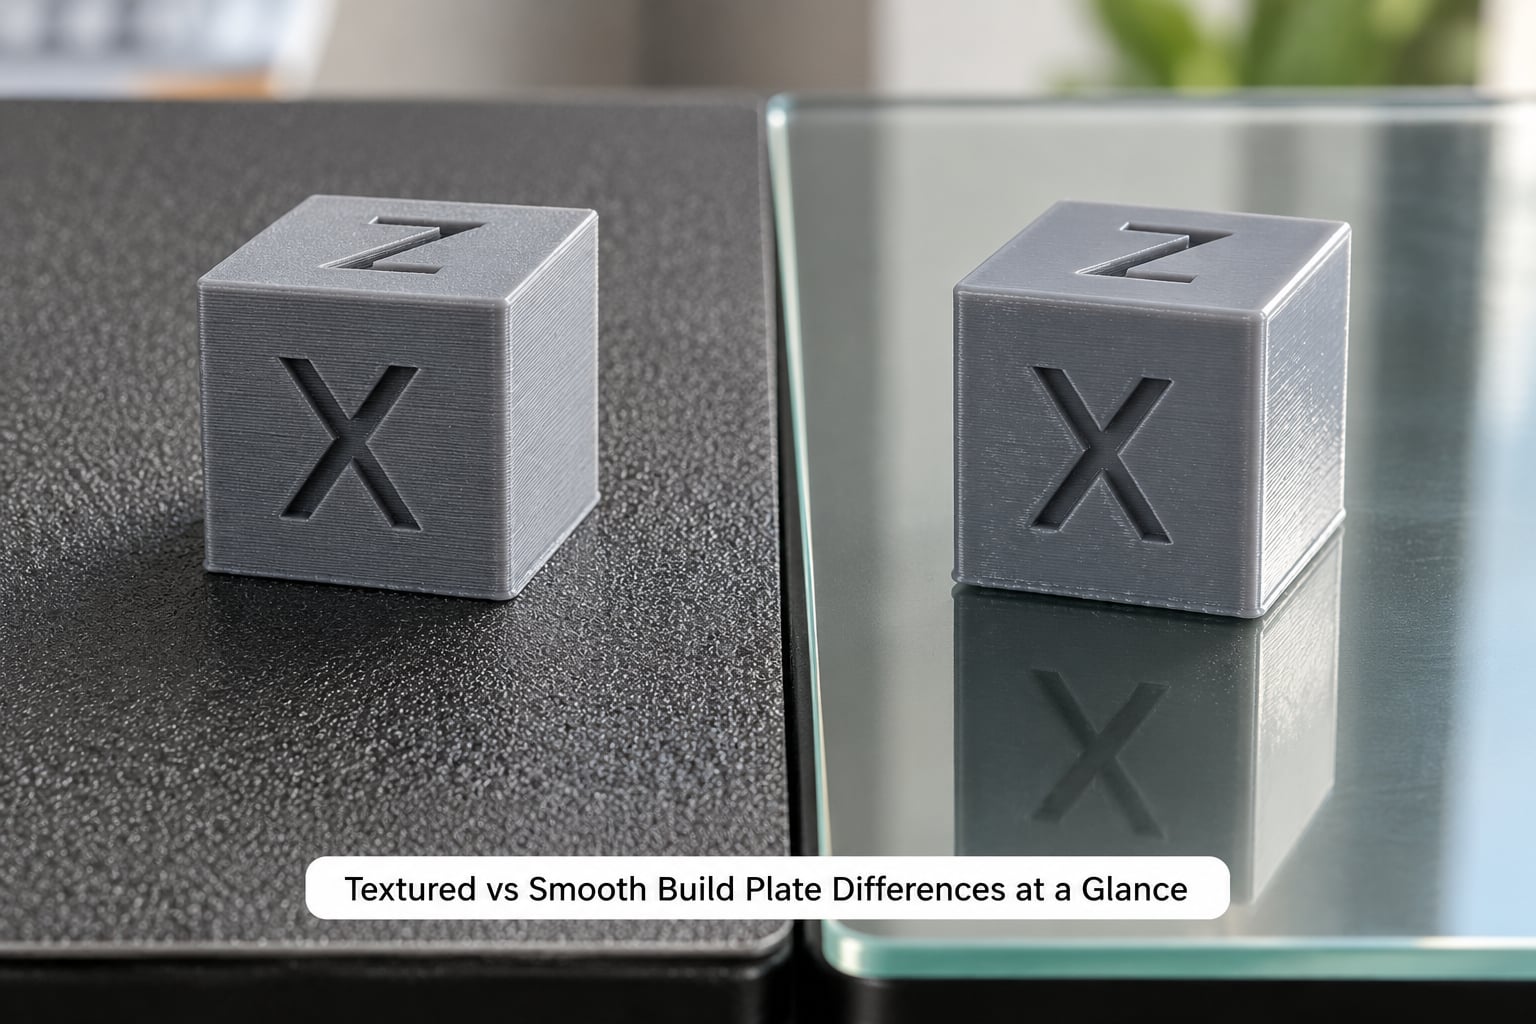
Here is the short version of the textured vs smooth build plate differences, criterion by criterion.
| Criterion | Textured / powder-coated PEI | Smooth PEI sheet |
|---|---|---|
| Surface | Matte, stippled, slightly rough to the finger | Glossy, near-mirror, uniform |
| How it grips | Mechanical keying plus chemical adhesion | Chemical adhesion alone |
| First layer | Forgiving of slight Z-offset and mesh errors | Sensitive to a dirty surface and too-low Z-offset |
| Typical bed temperature limit | Around 180 C on most plates | Around 120 C on most plates |
| PLA | Excellent, no adhesive needed | Excellent, no adhesive needed |
| PETG | Good, but glue stick helps release | Strong bond, glue stick strongly advised |
| TPU | Works, easier to peel off | Works, but can creep into the sheet |
| Bottom finish | Matte with visible micro-texture | Glossy, print-quality underside |
| Part removal | Peels away warm with light force | Waits until fully cool, then lifts |
| Cleaning | Dish soap and water, sparing IPA | IPA works well on grease and fingerprints |
| Best for | Functional parts, first prints, large plates | Display models, glue-ups, face-down printing |
Bed temperature limits vary by brand, so check the sheet printed on your own plate before running engineering filaments at the top of the range.
How Build Plate Texture Changes First-Layer Adhesion
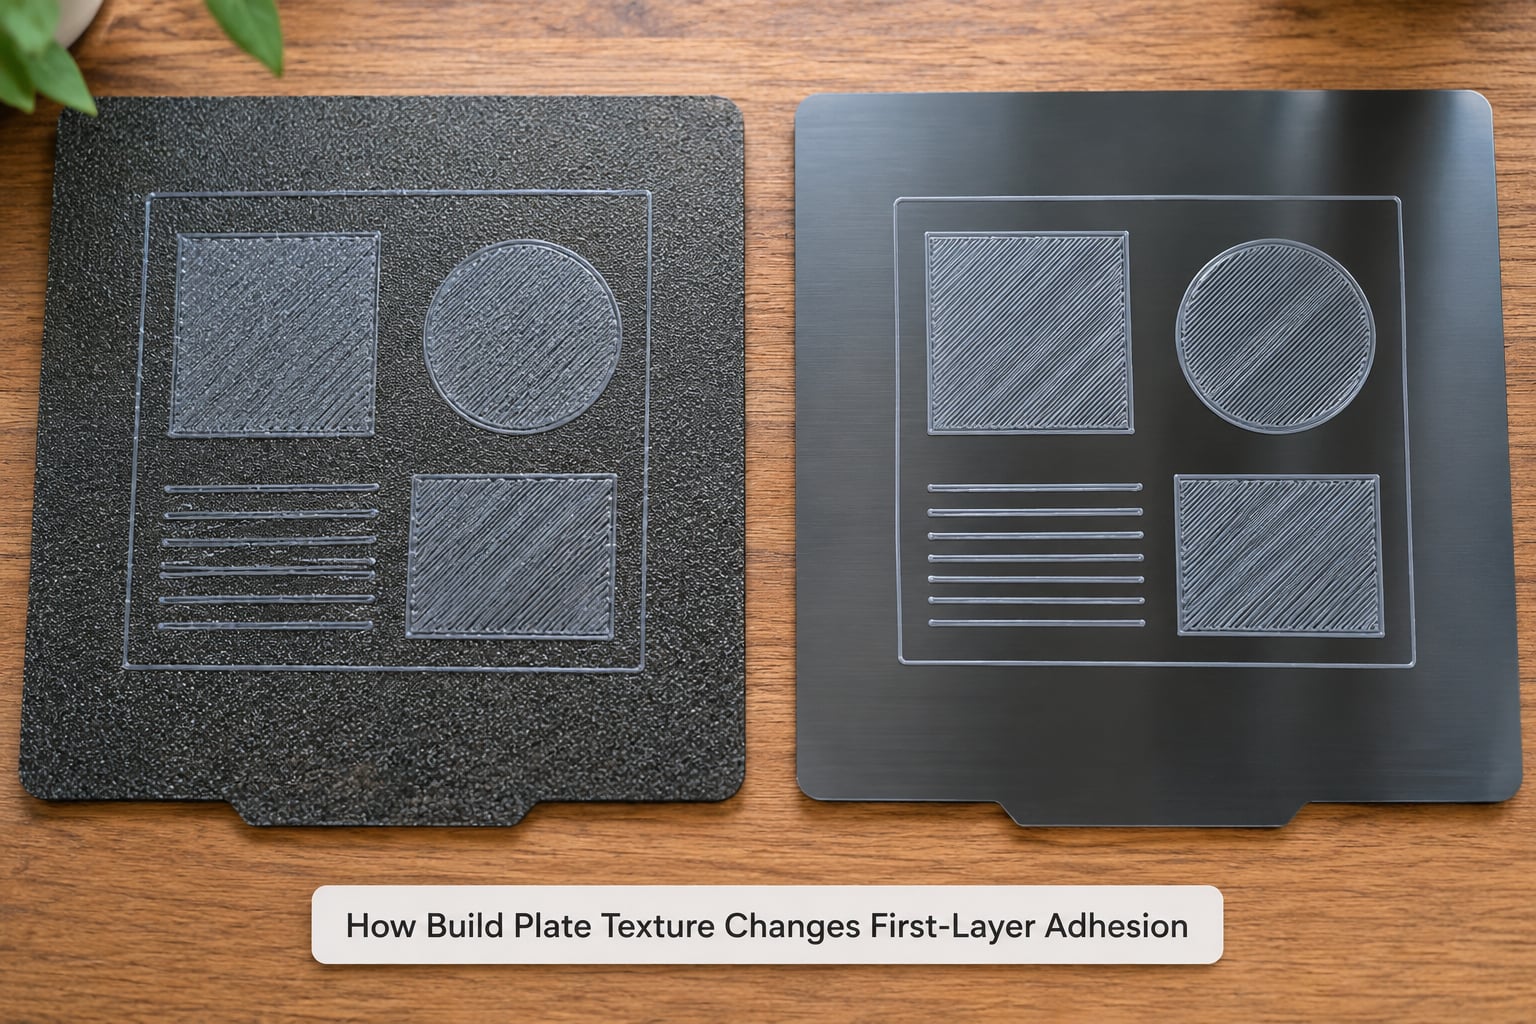
Both plate types are PEI, or polyetherimide, a plastic that holds onto molten plastic while hot and lets go as things cool. The mechanism is a thermal cycle: the molten first layer is pressed onto the warm plate, PEI holds it, then the plastic contracts as it cools while the steel plate barely moves, and that mismatch in shrinkage is what pulls the part loose from the plastic and away from the steel.
Textured surfaces add a second mechanism on top of that. The powder coat has microscopic peaks and valleys, and the molten filament keys into them like tiny hooks. That mechanical grip is why textured PEI forgives a slightly high Z-offset: if the nozzle is not quite squeezing the layer flat, the peaks still catch it.
Smooth PEI has no such peaks. The whole first layer depends on flat contact across the entire footprint and on the surface being clean. Put the nozzle a fraction too high and you get a part with no squish, loose corners and a perimeter that peels away when you tug it.
Signs your first layer is failing on one plate but not the other
Corners that lift while the middle holds is the classic signature of too little contact. So is the part that stays stuck while the plate cools, then releases halfway as you flex the spring steel.
Fingerprint oils are the sneaky one. A plate can look clean and still have a thin layer of skin oil across the middle where every print lands. On textured surfaces the peaks bridge over small smudges. On smooth surfaces the smudge is the whole contact patch, so adhesion drops gradually and people usually blame the bed mesh or the filament.
Do You Need to Re-Calibrate After Switching Plates?
Yes, and this is the single most common complaint after a plate swap. Switching surfaces changes your effective Z-offset even though your machine setting never moved. One Prusa forum user measured a printed thread at 1.0 mm on their smooth plate and 0.67 mm on their textured plate with identical settings, which is exactly the size difference the texture creates.
The textured peaks take up space, so a setting that is perfect on smooth glass can leave the nozzle sitting too high on a powder-coated sheet. Corners lift, the layer does not squish, and people usually respond by lowering the whole bed temperature instead of fixing the offset.
Here is the routine I would run after any swap.
- Clean and level first. Wipe the new surface, then run the bed mesh or paper test. A dirty plate makes every later measurement meaningless.
- Load the correct plate profile in the slicer. Bambu Studio and OrcaSlicer read a QR code printed on the sheet, but third-party plates have no QR code, so select the matching profile by hand.
- Re-run first-layer calibration. Bambu Studio and OrcaSlicer have a calibration flow that checks flow and height together. PrusaSlicer uses the First Layer Calibration wizard. Cura exposes plate profiles plus its own first-layer height adjustment.
- Print a single-layer test. A wide flat square at your normal speed tells you more than a tower. Look for continuous lines, no gaps, and no ridges where the nozzle started.
- Store the offsets per plate. Most slicers keep one Z-offset per profile, so use a separate profile per plate rather than re-tuning every time.
Surface Finish and Print Quality
Textured plates give you a matte, slightly stippled underside. Against a dark filament it reads almost like sandblasted metal, and it does one genuinely useful thing: it hides a bad first layer. Small ridges from an imperfect mesh or a slightly squashed first layer disappear into the texture.
Smooth plates give you a glossy base that looks like a finished surface. A clean first layer on smooth PEI comes out flat and reflective, which is why smooth is the plate of choice for anything photographed from the bottom or used as a display base.
There is a side benefit to the matte finish that people only notice afterwards. Elephant foot, the slightly bulged lower edge where the nozzle smears the first few layers, is obvious on a glossy plate and nearly invisible on a textured one. That means less sanding and less post-processing work per part.
The tradeoff runs the other way too. A textured sheet is harder to keep pristine, so a scratch or a divot left by a previous part is visible on the next print’s base. Smooth PEI wipes clean and stays visually consistent.
Printing Face-Down: Mating Surfaces and Glue-Ups
If any surface of your part has to stay flat, the plate finish matters more than anything else on this page. A textured base transfers its micro-pattern to that face, so the surface is no longer truly flat even after you sand it lightly.
This shows up in a few places. Snap-fit lids bind because the two mating faces are patterned rather than planar. Glue joints get a matte, slightly porous face that holds glue better but never sits truly flush. Model kits with a display base printed directly on the bed lose the clean underside people paid for.
Forum threads on r/BambuLab and r/3Dprinting keep coming back to the same conclusion: people who care about this print face-down on the smooth plate and accept the extra glue-stick management as the price.
Warping, Curling, and Heat Performance
Texture affects warping only indirectly. A part warps because it shrinks as it cools and because the layer that touches the bed is held in place while the rest is free to move. Surface grip matters because it anchors that first layer, but the dominant factors are bed temperature, part size, chamber temperature and airflow.
Open-frame printers with a draught in the room will warp large ABS and ASA parts on any surface. Community advice repeats this constantly: no build plate fixes warping caused by still air, and an enclosure matters more than the coating.
Heat performance is where the two plates separate clearly. Powder-coated plates are typically rated to around 180 C, and smooth PEI sheets to around 120 C. That gap decides the plate for polycarbonate, nylon and carbon-fibre blends, which need a hot bed and an enclosed chamber anyway.
Which Materials Work Best with Each Plate?
PLA on textured versus smooth
PLA is the easy case. It sticks to both surfaces with no adhesive at all, and the choice comes down to the finish you want plus how forgiving you need the first layer to be. Textured is the safer default for beginners.
PETG: where vendor guides and users disagree
PETG is where you will read contradictory advice. One vendor guide says PETG bonds so tightly to smooth PEI that a cooling part can tear a divot out of the coating, so it recommends glue stick as a release layer. Another guide says textured PEI is the surface where PETG needs the glue stick, because PETG can over-bond to the powder coat too.
Both are describing a real failure. Manufacturer documentation is the tie-breaker here: check your printer’s own plate and glue table before following a forum. The practical rule that most people settle on is to apply a thin glue layer on either surface when printing PETG, and treat it as a sacrificial barrier you renew every few prints. Some users whose PETG releases cleanly from a textured plate skip it entirely and are fine, so test one square print before committing to a full enclosure.
TPU, ABS/ASA and engineering filaments
TPU prints on both surfaces. Textured is easier because the rubbery surface peels off with less force, while smooth PEI can let a soft material creep into the sheet during a long print.
ABS and ASA need a hot bed and an enclosed chamber, which rules out smooth PEI on most printers rated for them. Powder-coated plates are the standard choice for these materials, and carbon-fibre or glow-in-the-dark filled filaments are similar: high temperature, easy release from a textured surface, and no adhesive needed.
Polycarbonate and nylon are the hardest case on any FDM machine. They want a bed at or above 100 C, a sealed chamber and often a heated chamber for nylon, and they will shrink away from the plate if the surface is too cool. Textured high-temperature plates are the practical choice here, and no plate choice removes the warping risk.
The plate-to-filament matrix
| Material | Textured plate | Smooth plate |
|---|---|---|
| PLA | Ideal, no glue | Works, glossy base |
| PETG | Good, glue helps release | Strong bond, glue advised |
| TPU | Good, easy peel | Works, watch for creeping |
| ABS | Standard choice, needs enclosure | Bed temperature usually too low |
| ASA | Standard choice, needs enclosure | Bed temperature usually too low |
| PC | Use a high-temperature textured plate | Not suitable |
| Nylon | High-temperature textured plate, dry filament | Not suitable |
| CF or glow blends | Good release, abrasive nozzle recommended | Good release, abrasive nozzle recommended |
The third option beyond textured and smooth
Engineering plates sit at the far end of the smooth scale. They use a textured coating with a much higher temperature rating than ordinary smooth PEI, and their surface is aggressive enough that most filaments need a release agent such as glue stick. They make sense on machines that routinely run engineering materials, and they are poor general-purpose first plates for a beginner printing PLA.
Then there are effect plates. Pattern-transfer sheets use a microscopic surface structure that imprints a finish onto the base of the print, from holographic to carbon-fibre weave. They work like a textured plate for adhesion and produce a decorative underside rather than a plain matte one. If you only care about the look of the base and your filament is PLA, that is a cheaper way to get a graphic finish than post-processing.
Do Textured and Smooth Plates Need Different Slicer Settings?
Mostly yes, but not in the way people expect. The geometry settings that change are first-layer height, first-layer flow or speed, and Z-offset. Everything above layer one is identical once the plate swap is done properly.
Because textured peaks fill part of the gap, many users run a slightly lower Z-offset and a slightly higher first-layer flow on a powder-coated plate than on smooth PEI. Others do the opposite, because they are used to the extra squish the texture gives them and set the nozzle lower on smooth glass. There is no universal number, which is exactly why you calibrate rather than copy.
Temperature is the other adjustment. Smooth PEI generally runs a little cooler because its adhesion is stronger at lower bed temperatures, while textured plates tolerate or need more heat to key the first layer properly. Raising bed temperature does compensate for a bad Z-offset, and that is the trap: it fixes the symptom, slows the print down and pushes more heat into the part, which is unhelpful for large ABS parts already prone to warping.
Cleaning, Maintenance, and Plate Lifespan
Dish soap and warm water is the correct cleaner for powder-coated PEI. Isopropyl alcohol can be used sparingly, but soaking a textured plate in it repeatedly dries the coating and dulls the texture. Smooth PEI handles IPA better, and because grease and fingerprints show against the gloss, IPA is genuinely useful there.
Avoid the metal scraper on any coated plate, and do not pry a part off while the bed is warm. Cooling fully first is the single most upvoted piece of advice in every printer community, and it is the best way to avoid chipping a coating edge.
Textured plates wear out gradually, and the wear pattern is the useful diagnostic. Texture erodes first in the centre of the sheet, where nearly every print lands, while the edges still grip. If parts start failing to release and your first layer looks visibly less stippled in the middle, the centre is gone even though the plate looks fine at a glance. Flip the sheet to use the other side and you roughly double its life.
Smooth PEI fails differently. It looks nearly new for a long time, then a print sticks too well and pulls a section of coating with it, leaving a divot that needs filling or replacing.
Cleaning method by surface
| Surface | Cleaner | Avoid |
|---|---|---|
| Textured powder-coated PEI | Warm water and dish soap, dry with a soft cloth | Heavy IPA use, metal scraper, abrasive pads |
| Smooth PEI sheet | IPA or dish soap, wipe and let dry fully | Metal scraper, cleaning while hot |
| Engineering plate | Manufacturer guidance first, usually soap and water | Assume PEI rules apply unchanged |
| Pattern or effect plate | Soft cloth only, minimal liquid | Anything that polishes the micro-structure |
One more maintenance habit worth naming: clean between materials. A bed that has printed ABS all week carries a film that a PLA print will find. It takes thirty seconds with a damp cloth and prevents most of the adhesion problems people spend an evening troubleshooting.
Which Should You Choose?
Choose textured when you want the most forgiving setup: easy PLA prints, prototypes, functional parts, large prints and anything that needs a hot bed for ABS, ASA, PC or filled filaments. It sticks when your mesh is imperfect and releases when the plate cools.
Choose smooth when the underside is part of the product. Display models, face-down printing, parts that glue to another printed face, and vase-mode pieces where the base is visible all benefit from the glossy finish.
Owning both is common and cheap in effort on a magnetic platform. Swapping a spring steel sheet takes seconds, and the cost is storing a second plate flat. Store it flat, because a warped plate will not flatten again once it has curled.
Enclosed and open-frame machines also shift the balance a little. On an enclosed printer running hot engineering materials, you are already committed to a high-temperature textured plate, so a smooth plate only earns its place as a second surface for PLA display work. On an open-frame machine mostly printing PLA and PETG, the smooth plate is more useful because you can dedicate it to anything that needs a clean base.
Third-party plates are worth considering for a dual-plate setup, since you can pick a second surface without changing printers. Just remember that they carry no QR code, so the profile has to be selected manually in the slicer, and third-party powder coats vary in grit and temperature rating in ways the stock plate does not.
One naming trap worth flagging: plate names get reused across generations. Cool Plate, High Temperature Plate, Textured PEI and Smooth PEI can all refer to different surfaces depending on the printer model and year. Read the specification printed on the sheet itself, and select the matching slicer profile, because a mismatched profile is a common source of first-layer problems on third-party plates with no QR code.
Frequently Asked Questions
What are the key differences between smooth and textured build plates for 3D printing?
Both are magnetic spring-steel platforms with a PEI surface. The textured powder-coated plate grips the molten first layer mechanically as well as chemically, forgives small Z-offset and mesh errors, tolerates bed temperatures near 180 C, and leaves a matte underside. The smooth PEI sheet relies on chemical adhesion alone, is rated lower at around 120 C, needs a spotless surface, and leaves a glossy underside. Choose textured for adhesion and engineering materials, smooth for finish quality.
Does PLA stick to textured PEI without glue?
Yes. PLA bonds to powder-coated PEI with no adhesive at all, which is one of the main reasons textured plates are recommended for beginners. The stipple gives the molten layer mechanical keying, so adhesion holds even when the bed mesh or Z-offset is slightly off. On a smooth plate PLA also sticks well, but it depends more heavily on a clean surface and correct first-layer compression.
Is a textured PEI plate good for PETG?
Usually yes, and PETG is the material where advice conflicts. Vendor guides disagree on which surface needs a glue stick, because PETG can bond tightly to both powder coat and smooth PEI and tear a divot out of the coating on cooling. The safe approach is a thin sacrificial glue layer as a release barrier, or test one flat square print first if PETG already releases cleanly from your textured plate.
Do textured PEI plates wear out and how long do they last?
They wear out gradually rather than suddenly. Texture erodes fastest in the centre of the sheet, where most prints land, while the edges still grip, so a plate can look acceptable and still lose adhesion where it matters. Check the middle of the sheet for a visibly flatter, glossier patch. Flipping the plate to the unused side roughly doubles its life, and always let parts cool fully before removing them.
Can I print TPU on a textured PEI plate and does it need glue?
TPU prints on textured PEI without any adhesive, and the textured surface is usually the easier option for rubbery filaments because they peel away with less force. On a smooth sheet, soft material can creep into the sheet during a long print and make removal harder. Keep the filament dry and slow the first layer slightly, and you will not need glue on either surface.
Conclusion
The whole textured vs smooth build plate differences debate is one tradeoff: mechanical grip against finish quality. Textured plates forgive bad first layers, run hot and print engineering materials; smooth plates give you a glossy, flat, print-quality underside and demand a clean bed and a correct Z-offset.
Start by deciding what you are printing most and how the base should look. Then clean the plate with the method that suits its surface, level it, and only after that tune bed temperature and first-layer adhesion. Switching surfaces later changes your effective Z-offset, so re-run first-layer calibration rather than adjusting temperature to compensate.