You cannot print parts larger than your build volume on that machine in one piece, so there are four routes: shrink the model, split it into printable sections and join them, use an oversized printer, or commission a print service. Tiling is the version for flat objects like panels and terrain; sectioning with designed joints is the version for shells like helmets and planters.
Most of the difficulty is not the printing. It is deciding where the seam goes, sizing the connectors so the pieces actually fit, and keeping everything registered while the adhesive cures. Get those three right and a 2026 desktop machine can turn out objects far bigger than its plate.
Table of Contents
- 1How to Print Parts Larger Than Your Build Volume: the Five Methods
- 2What You Need
- 3Step-by-Step
- 4How to Print Parts Larger Than Your Build Volume With Tiling
- 5How to Print Large Parts by Sectioning
- 6How to Print Parts Larger Than the Build Volume by Scaling or Redesigning
- 7How to Print Large Parts With an Oversized Printer or Service
- 8Common Mistakes
- 9Frequently Asked Questions
- 10Can you print a part larger than your 3D printer’s build volume?
- 11What is the best way to print an oversized 3D model?
- 12How do you join 3D printed sections together?
- 13Does tiling make a 3D printed part weaker?
- 14Are large-format 3D printers worth it for oversized parts?
- 15How much should I scale a model to fit my printer?
- 16Conclusion
How to Print Parts Larger Than Your Build Volume: the Five Methods
- Tiling. Cut a flat object into repeating tiles that each fit the plate, with small tabs on the edges. Best for terrain, coasters, floor panels and anything you intend to fill with epoxy or grout.
- Sectioning with designed joints. Split a shell into two or more parts and add dovetails, puzzle tabs, pins or screw bosses. Best for helmets, cosplay armour, planters and props.
- Scale down. Shrink the model until it fits, if the part is a prototype or a display piece where real-world size does not matter.
- Redesign. Reorient the part, hollow it, add ribs instead of solid walls, or simplify geometry so it fits within the existing volume while keeping its function.
- Outsource. Send the file to a print bureau with a large-format machine, or buy a large-format printer if you will produce oversized parts regularly.
What You Need
Build volume is the largest X by Y by Z box a printer can physically print, set by the frame, the gantry and the bed. Your usable volume is always smaller than the rated number because of skirt and brim width, edge clearance, bed clips and travel limits.
A printer quoted at 256 by 256 by 256 mm often gives you about 250 mm of usable area once you factor in a 3 mm brim on each side. Before you cut anything, drop a plain cube of exactly your rated build volume into your slicer next to the model. If the cube overlaps it, the model is genuinely too big.
Here is the rest of what to gather:
- A mesh editor or slicer with a cut tool. Meshmixer is the most commonly recommended option in maker communities, Blender and FreeCAD do the job too, and PrusaSlicer, Cura and Bambu Studio all ship a built-in splitter.
- The original file if you have it. A CAD or mesh source file lets you re-cut cleanly. Splitting an STL and re-exporting accumulates error across every cut.
- A dry-fit tool. A registration collar, alignment jig or two flat clamping plates are enough. You can print the jig from the same file.
- Adhesive matched to the filament. Cyanoacrylate for PLA and PETG, epoxy for load-bearing joints, a solvent weld for ABS and ASA, and nothing at all for TPU in most cases.
- Filler, primer and paint if the surface has to look continuous rather than assembled.
- Paper, tape or an L-square to check that printed tiles share a flat datum plane.
Step-by-Step
How to Print Parts Larger Than Your Build Volume With Tiling
Tiling works when the object is essentially a flat slab: terrain tiles, a base, a wall panel, a cosplay pauldron front, a tray. Each tile prints on its own and the parts reassemble into one continuous surface, usually with epoxy poured across the joints.
- Measure the real footprint. Load your model into the slicer and check the bounding box dimensions against your usable plate area, not the rated one.
- Decide the tile grid. Divide the footprint into tiles roughly 80 to 90 percent of your usable plate size. That margin leaves room for the connecting tabs and for a raft or brim if the material needs one.
- Cut along the grid. In Meshmixer, select the whole model, use the plane cutter or slice tool, and position each cut. In the slicer, the equivalent is Split to Parts with a rectangle region. Export each tile as its own STL.
- Add the connection. Give each tile a small tongue on one edge and a matching recess on the next. Roughly 10 mm wide by 3 mm tall is a workable starting point, and the tongue should be the full height of the tile so the joint is not a single thin web.
- Dry fit before printing. Print one tile, print a scrap tongue test, and check that two edges meet with a consistent gap. Adjust clearance in the model before committing to the whole set.
- Print with the joined face down. The last layer of each tile becomes the finished surface. Tearing that face off a textured plate later is much easier than filling and sanding the top.
- Assemble on a flat surface. Butt the edges together, tape the back, and flood the seams with epoxy. Add a weight or clamp until it cures.
If your tiles came out at slightly different thicknesses, shim them with a thin layer of filler rather than clamping harder and bowing the panel. Uniform pressure matters more than heavy pressure.
How to Print Large Parts by Sectioning
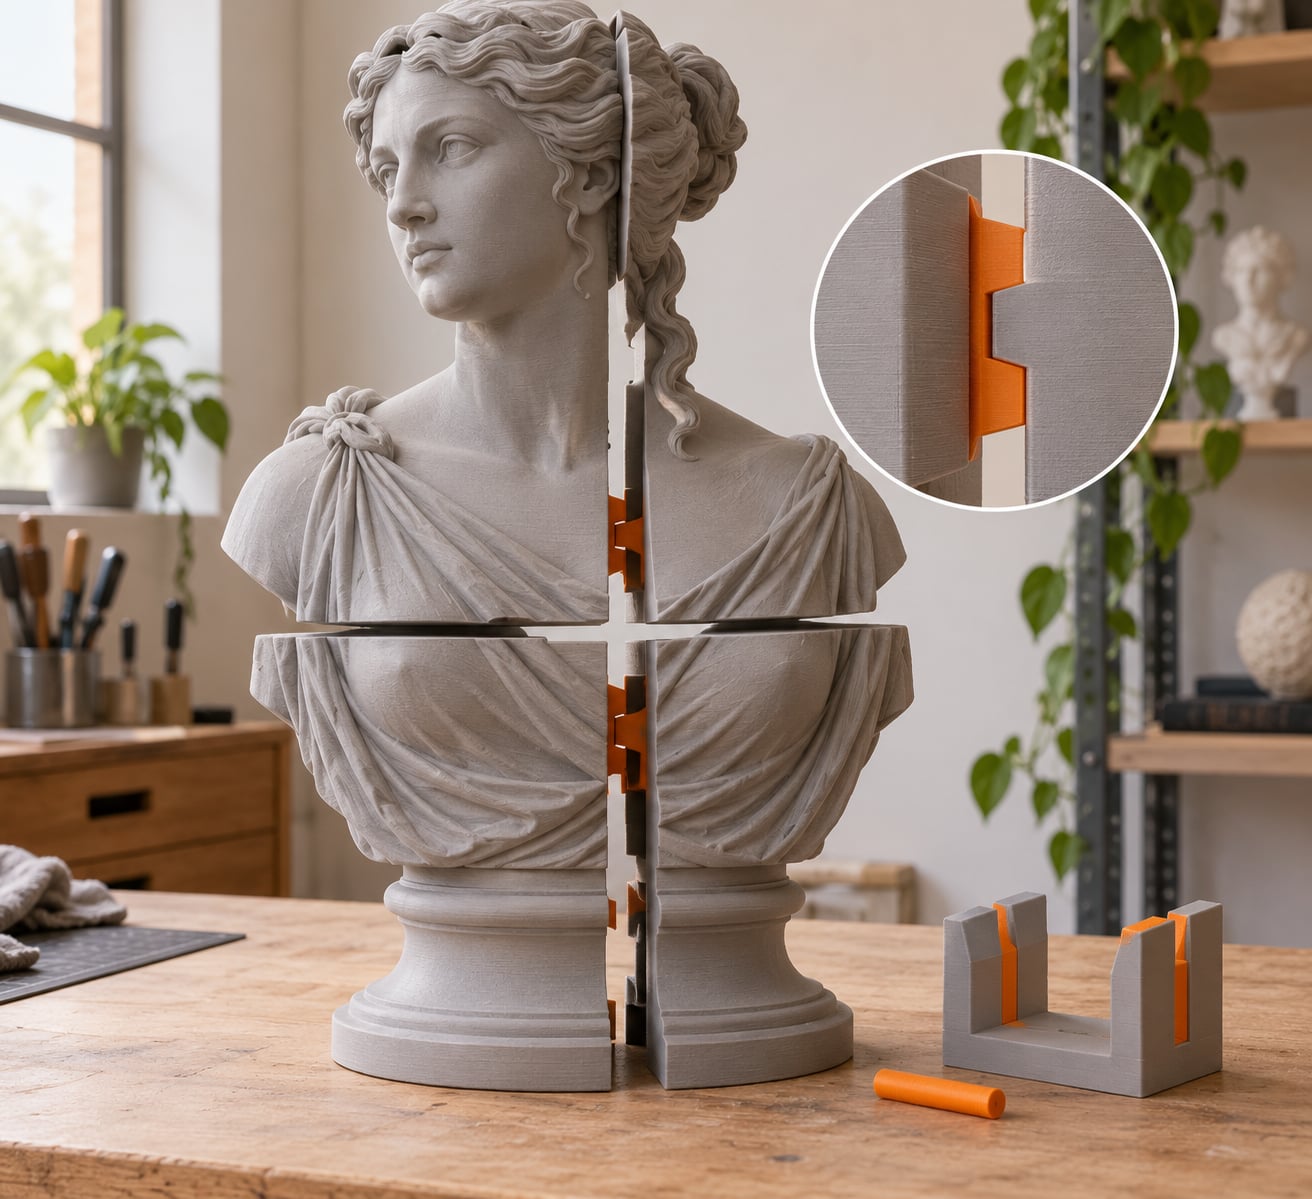
Sectioning suits hollow or curved objects where the seam needs to disappear into a design line. The connector does two jobs at once: it holds the pieces in position while the glue sets, and it carries the load afterwards.
A plain butt joint is the weakest option. Glue film on a flat face has little area and no mechanical interlock, so it peels apart under bending. Anything that carries load or gets handled wants a shape that resists pulling apart.
Here is how the common joints compare, from weakest to strongest:
- Butt joint. Poor alignment without a jig, and the weakest option because glue film is all you get. Low difficulty.
- Puzzle or finger joint. Good alignment and strong, thanks to a large glue area. Medium difficulty.
- Dovetail. Self-locating and resists pull-apart because of the flare. Medium difficulty.
- Pin and socket. Good alignment when used with a collar, strong in shear. Medium difficulty.
- Screw and insert boss. Self-locating, the strongest and fully reversible. Higher difficulty.
Dovetails are the community favourite for a reason: the flare means the piece can only seat one way, and glue gets into the angled faces rather than sitting on a flat film. Several joints per seam beat one, so two or three dovetails along a helmet cut will not flex the way a single one will.
Sizing matters more than people expect. For pins and sockets, print the hole slightly under nominal and let the printer’s own elephant-foot swell close the gap, or print the pin at nominal and the hole 0.2 to 0.3 mm larger. A 3 mm pin with a 3.2 mm hole usually fits on a well-tuned machine. Bigger is not safer: a loose pin carries the load on glue alone, and a tight one cracks the socket when you force it together.
Print the socket sections with the pin axis vertical where you can, because that direction gives the cleanest round hole. A pin printed upright is also less likely to snap, since the load runs along the layers instead of across them.
Keep the parts registered while the adhesive cures. A registration collar is the simplest fix: design a ring that slips over the outside of both sections and locate the seam through it. Beyond that, print a flat alignment plate with a recess for one section and a slot for the other, and clamp the two down onto it. Dry fit everything with tape only first, take it apart, inspect the seam, then bond for real.
Match the adhesive to the material:
- PLA with cyanoacrylate. Fast, cheap and a strong joint. It wicks into the print, so apply sparingly along the seam rather than flooding the face.
- PETG with epoxy. PETG barely bonds to itself, so a mechanical interlock matters more. Epoxy with a roughened or sanded mating face gives a reliable structural joint.
- ABS or ASA with a solvent weld. Apply the solvent to both faces, let them soften, press together and hold. The result fuses the material itself and beats adhesive on strength.
- TPU with mechanical fastening. Adhesive barely grips a flexible surface. Use screws, rivets or a captured pin.
- Fibre-filled filaments. The binder in the fill wicks adhesive poorly, so again rely on shape rather than glue, and sand the mating faces before bonding.
Once the bond has cured fully, knock the seam back with a 120-grit sanding block, fill any residual line with a two-part filler, work it back with 180 and 220 grit, then prime and paint. Filling the seam and sanding it flush is the standard fix users reach for, and it works better than trying to close the gap in the model.
How to Print Parts Larger Than the Build Volume by Scaling or Redesigning
Scale down when the printed item is a prototype, a display piece or a fit-check model. Scale to 90 to 95 percent of the usable plate size, not to the edge of it, and check wall thickness after scaling. A thin wall scaled down becomes a wall your nozzle cannot produce.
Rotate the part. Many models are laid out wider than they are deep. Turning a 400 by 180 by 300 mm object on its side can turn an XY problem into a Z problem, and Z has no usable print area limit to speak of.
That Z route is underused. For a tall thin part, vase mode prints a single continuous wall with no infill and no top surface. The whole part becomes one tall ribbon of extrusion, so there is no seam between sections to fail. What limits it is wobble, not build volume, and it only works for open shapes without overhangs.
Hollow and rib instead of filling. If the part exceeds your volume because it is solid, give it 2 to 3 mm walls with an internal rib grid. You lose a little weight and gain a lot of printability, and you can still cut it into sections afterward.
Simplify geometry. Genuine detail on a model surface usually matters visually only. A low-resolution model that prints at full size often reads better than a high-resolution one at a reduced scale, because the fine detail is below the nozzle anyway.
The test is simple. After any redesign, load the file back into the slicer and read the bounding box. If it fits and the wall thickness still prints cleanly, stop. Do not redesign features the part actually needs to function.
How to Print Large Parts With an Oversized Printer or Service
Splitting stops making sense when you need many copies, when the seam would sit in a load path, or when the finish has to be flawless. At that point, use a bigger machine.
Trade presses usually split the market into regular format, the familiar desktop and small industrial machines; medium format, roughly 500 mm to 1 metre in each direction; and large format, beyond a metre. Medium format is where most oversized hobby projects now land, and it is the tier with the widest range of machines and materials.
For a print service, send the file and specify four things: the material, the orientation on the plate, the tolerance you can accept at the seams or interfaces, and the finish tier. Ask how they handle pieces that exceed their own volume, since some will split internally and hand you back two panels you never saw cut.
Confirm who owns the IP and what file format they keep, and ask for a small test coupon in the same material before committing to the full part. Print services will happily quote without a single question, which tells you very little.
Buying a large-format machine makes sense when oversized work is a repeat product rather than a one-off. Below that, the capital and the floor space go to waste, and a well-planned sectioned print from a desktop machine costs a fraction of it.
Common Mistakes
Gaps between the pieces you are joining. The most reported problem in maker forums, and usually a clearance mistake rather than a gluing mistake. Increase hole clearance by 0.2 to 0.3 mm, or increase the fit on the pin. If the pieces fit only by force, the joint will be loose the moment the glue sets.
A seam you can see and a joint you can feel. Before bonding, print both sections and check them against a straight edge. Where the surfaces are not coplanar, sand the proud one back rather than forcing the fit and hoping filler hides it.
Seam lines in the slicer output. This is usually the Z-seam, not your cut. Set the seam to a sharp corner, use aligned or painted seams, and turn on wipe or coast so the nozzle re-extrudes over the start point.
The split file will not slice. Mesh editors can leave non-manifold geometry, zero-thickness walls or open shells where the cut passed through a thin feature. Run a mesh repair in Meshmixer or Blender, thicken any wall thinner than one extrusion width, and close the shell before exporting.
Accumulated dimensional error across many sections. Every cut and re-export adds a little error, so four or more parts will not close as cleanly as two. Split once, then measure each printed part against the model, and scale any section that lands out.
A warped joint. Large flat sections lift at the corners and refuse to sit flat. Print them with a brim, keep the chamber steady if the material needs it, and clamp them down to the jig while the glue cures.
Not enough support for the cut faces. Once a part is split, an overhang that was previously interior can become exposed. Check each new section on its own rather than assuming the original support settings still apply.
Inconsistent scaling between sections. Print a test coupon with each joint before committing to a 30 hour print, and confirm the fit on the real materials you will bond.
Frequently Asked Questions
Can you print a part larger than your 3D printer’s build volume?
Not in one piece on that machine, because the build volume is a hard physical limit set by the frame and bed. You can still make the part by scaling the model down, redesigning it to fit, cutting it into printable sections and joining them, or sending it to a printer with a larger build volume. The sectioning route is what most makers use, and with designed dovetails or pins the result can be as strong as the shape suggests.
What is the best way to print an oversized 3D model?
For a one-off, split the model into two or three sections with dovetails, puzzle tabs or pins, print them separately and join them. For flat objects, tile it instead with interlocking edges. If the part must be flawless or you need several copies, commission a large-format print service rather than fighting the seam. Scaling down is best only when real-world size does not matter.
How do you join 3D printed sections together?
Design the joint first, because a flat glue film is the weakest option. Dovetails or puzzle tabs self-locate and resist pulling apart; pins and sockets resist shear; screws with printed bosses are strongest and stay reversible. Then use a jig or registration collar to hold alignment while the adhesive cures. Cyanoacrylate suits PLA and PETG, epoxy takes the load, and a solvent weld is best for ABS and ASA.
Does tiling make a 3D printed part weaker?
It can, and the weakness is always at the seam rather than in the material. A plain butt joint bonded with adhesive has little surface area and fails by peeling. Interlocked joints spread the load across many glued faces and can approach the strength of a single print, especially with two or more dovetails along the cut. Filled and reinforced tiles poured with epoxy can end up stronger in bending than the original solid slab.
Are large-format 3D printers worth it for oversized parts?
Only if oversized work is regular rather than occasional. Medium-format machines around 500 mm to 1 metre cover most projects that used to need tiling, but they cost far more, need floor space and usually an enclosed chamber. For occasional large parts, splitting on a desktop machine or ordering from a print service is cheaper and often faster than waiting to buy and set up new hardware.
How much should I scale a model to fit my printer?
Scale to about 90 to 95 percent of your usable print area, not to the edge of the rated build volume. Brim, skirts, bed clips and travel limits eat into the space, and a part scaled to the last millimetre will not clear them. After scaling, check wall thickness still exceeds one extrusion width, and print a small coupon first to confirm the details survive the reduction.
Conclusion
Measure the finished part first and check it against your usable print area, not the number on the box. Then pick the least complex method that preserves what the part has to do: scale it if size is arbitrary, tile it if it is flat, section it with designed joints if it is a shell, and outsource if the finish cannot tolerate a seam.
Dry fit every joint before bonding. That one afternoon of checking saves a 30 hour print.