To join large 3D prints into one piece, split the model into sections that fit your build volume, design an alignment feature on the mating faces, print each section flat, then bond them with the method that matches your filament. For most makers that means dry-fitting, scuffing the faces, solvent welding or epoxy, clamping until cured, and filling the seam. Budget a full evening for a two-piece assembly plus an hour of finishing.
Most desktop printers top out somewhere around a 256 mm cube. Anything bigger has to be printed in sections, and the joint is what decides whether the finished object looks like one deliberate piece or a pile of glued parts. The difference is rarely the adhesive. It is the geometry you design before the printer ever starts.
A few ground rules before the steps. Ventilate your workspace, wear eye protection when you handle solvent, and never run cyanoacrylate anywhere near a hot soldering iron, because the vapour off-gasses badly. If the assembly is going to hold a person, a moving vehicle part, or anything at height, use mechanical fasteners instead of glue. Adhesive joints are for structures, props, enclosures, armour, statues and panels.
Table of Contents
- 1What You Need
- 2Step-by-Step: How to Join Large 3D Prints Into One Piece
- 31. Choose How to Join Large 3D Prints by Material and Load
- 42. Inspect and Design the Joint
- 53. Clean and Mechanically Prepare the Surfaces
- 64. Make the Joint
- 75. Verify Alignment and Bond Strength
- 8Common Mistakes
- 9Frequently Asked Questions
- 10What is the best way to join large 3D prints made from PLA or PETG?
- 11Can large 3D-printed parts be joined without glue or welding?
- 12How much overlap do I need when joining two 3D-printed parts?
- 13How do I reinforce a weak 3D-printed joint?
- 14Can you join resin prints with the same methods as plastic filament prints?
- 15How long should a joined 3D print cure or cool before use?
- 16Conclusion
What You Need
You need less than most people expect, but the shopping list depends entirely on which filaments you are joining. The same part in ABS and in TPU needs completely different gear, so work through these categories in order.
Materials and filaments you are joining. Know the exact material of both halves before anything else, because solvent welding only works on ABS and ASA, and almost every adhesive behaves differently across PLA, PETG, TPU and resin. A generic “plastic glue” will not tell you what it bonds and what it merely sits on top of.
A joining method that suits that material. Solvent and welding rod for ABS and ASA, two-part epoxy for structural joints on PLA and PETG, cyanoacrylate gel for quick non-structural fits, or printed-in hardware for anything that has to come apart again. Details on each are in step one.
Surface preparation supplies. Isopropyl alcohol for degreasing, 180 to 220 grit for knocking down gloss on the bonding face, and 400 to 600 grit for final smoothing. A plastic-scraping or filing tool helps you check flatness. For resin prints you also want a wet sander with 400 grit paper and a rinse bath.
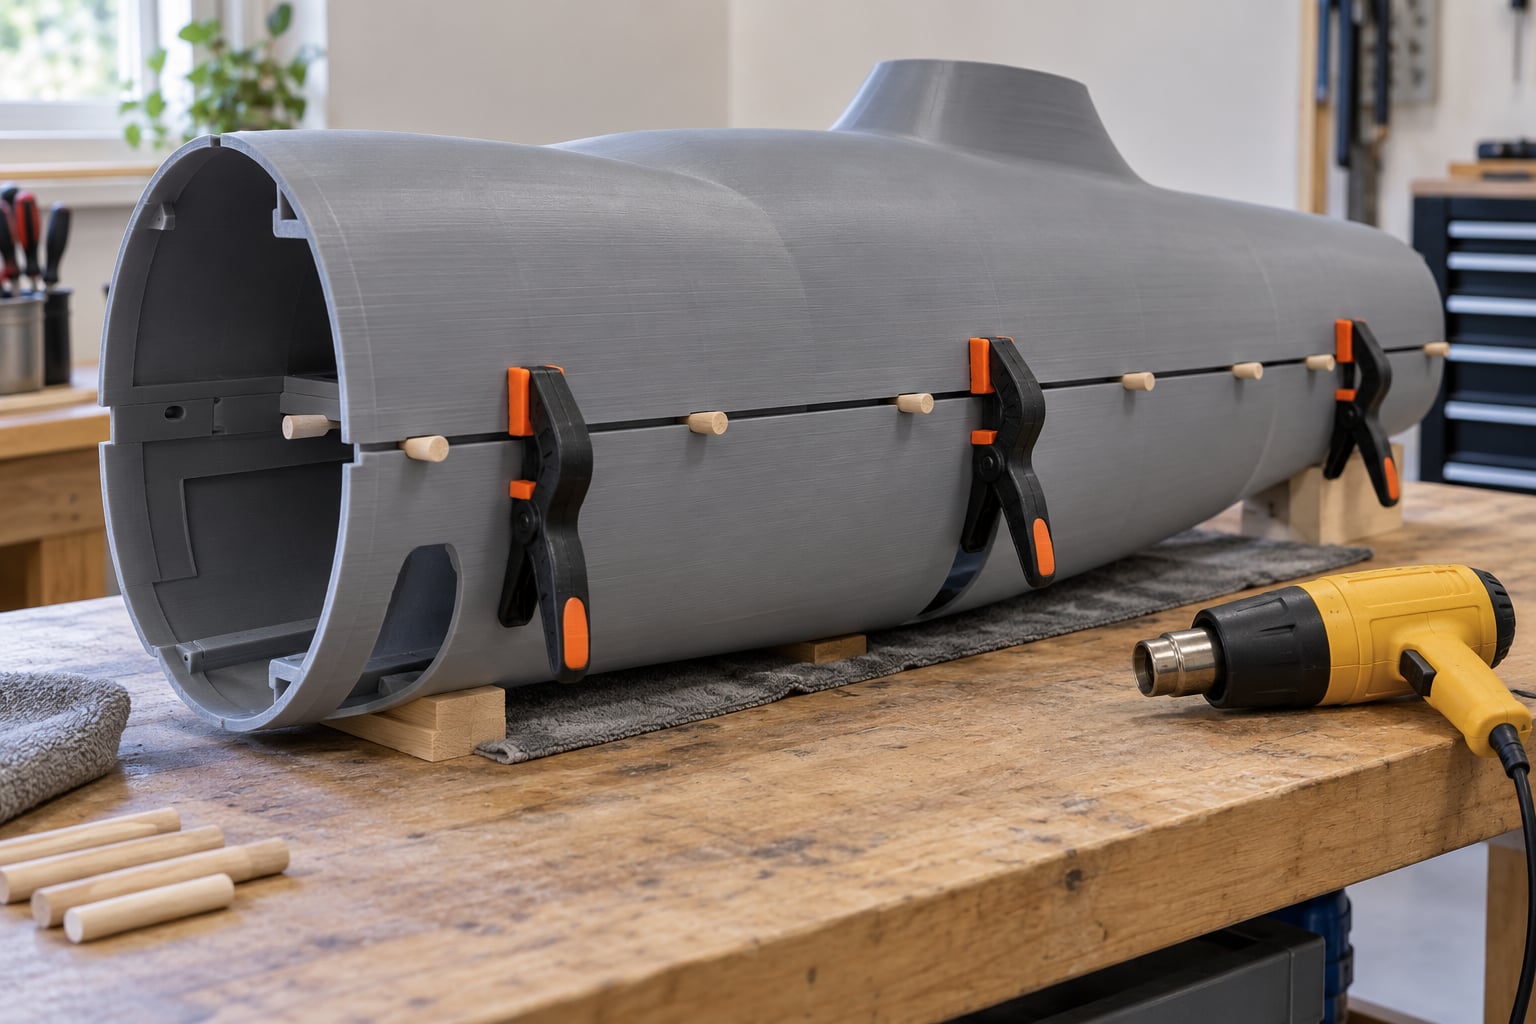
Clamping and fixturing. Spring clamps, bar clamps, and a flat sacrificial board bigger than the joint. For anything wide and flat, build a simple assembly jig: two flat boards and some spacers, so the halves cannot slide while the adhesive sets. This is the single most-asked question in the maker forums, and a jig answers it better than clamps alone.
Ventilation and safety gear. A fume extraction fan with a carbon filter if you are solvent welding or heat welding, safety glasses, nitrile gloves for resin, and a respirator if you are working with two-part epoxy in a small room. A welding gun or hot blade also wants a fire-resistant surface underneath it.
Post-join inspection gear. A caliper for checking alignment, a straightedge for checking flatness across the seam, and a scrap coupon printed at the same time as the real parts so you can test fit and bond on the offcut first.
Step-by-Step: How to Join Large 3D Prints Into One Piece
Five steps, in this order. Most failed assemblies are the result of doing them out of sequence, usually bonding before the faces are truly flat or moving the parts while the adhesive is still soft.
1. Choose How to Join Large 3D Prints by Material and Load
Solvent welding is the strongest bond you can make on ABS and ASA, and it does nothing on PLA or PETG. Two-part epoxy is the general-purpose structural answer, while heat welding with a 3D printing pen or plastic welding gun works on most thermoplastics and gives you a seam you can sand flush.
Here is how the main methods compare, so you can match one to the job in front of you.
| Method | Works best on | Bond strength | Seam | Skill level |
|---|---|---|---|---|
| Solvent weld | ABS, ASA, PS, HIPS | Highest, joins the material itself | Nearly invisible after sanding | Easy |
| Two-part epoxy | PLA, PETG, ABS, ASA, filled filaments | Very high, gap filling | Visible unless filled and sanded | Easy |
| Plastic welding rod or 3D pen | PLA, PETG, ABS, ASA | High, fuses layers across the joint | Bead sits proud, sands down well | Moderate |
| Hot-air plastic welding gun | Thicker ABS, ASA, PP parts | High, welds thick sections | Thick bead, grind or plane level | Moderate |
| Cyanoacrylate (super glue) | PLA, ABS, quick non-structural fits | Good on rigid flat faces, brittle on flexing parts | Fine, slight yellowing possible | Easy |
| Heat staking | PLA, PETG with printed-in stakes | Good, no adhesive needed | Small dimples at each stake | Easy |
| Mechanical fastening | Any material, any load case | Highest, and reversible | Visible hardware or countersunk holes | Moderate |
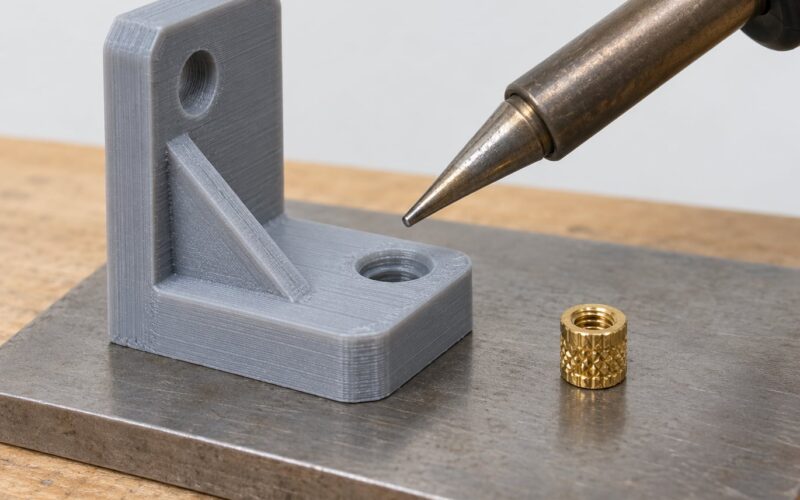
Threaded fasteners win on load and lose on looks, so the interesting cases are in between. A printed-in captive nut plus a machine screw gives you a flat outer surface once the bolt is countersunk, and it lets you disassemble the part later. Heat staking is the unsung option: model flat tabs on one half and matching posts on the other, then melt the posts with a soldering iron or heat gun until they mushroom into the tabs. No adhesive, no fumes beyond the plastic itself, and it cannot flex the way a glued lap joint can.
One warning from people who learned this the expensive way. PVC cement and model airplane cement do nothing useful on PLA or PETG, and UV resin “welding” produces a weak, brittle bond that looks convincing. They are not substitutes, and buying a tube to find out is a common waste of money.
2. Inspect and Design the Joint
A strong joint is mostly decided at the modelling stage, so spend your effort on overlap area and alignment features rather than on the glue. Before you print anything, look at where the cut line falls and what the load path through the finished part will be.
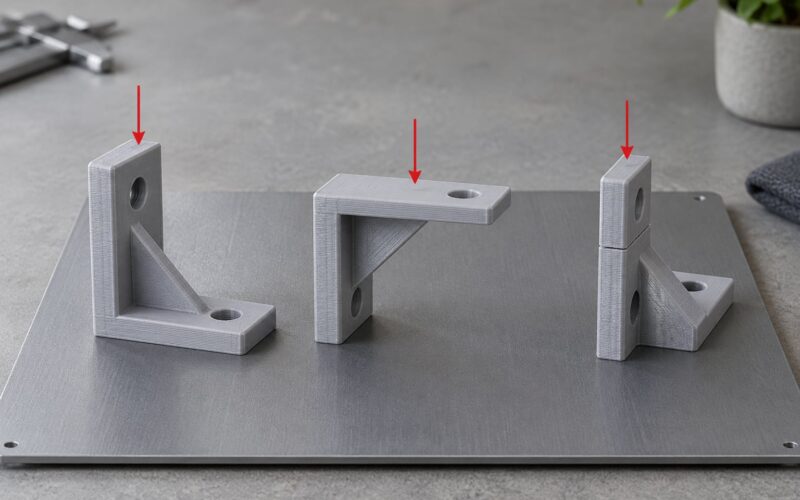
Check for warping. Large flat prints on a heated bed curl at the corners, and a curved mating face never sits flush no matter how good the adhesive is. The fix is to orient the cut so both mating faces print flat on the bed, adding a brim if the footprint is large, and to keep the split line off the sharp corner where peel forces concentrate.
Give the joint real overlap. A flat butt joint where two faces meet end to end has almost no strength. Lap the halves so they share a wide face, or design a tongue-and-groove. If you want a number to aim at, an overlap area of roughly 25 square centimetres per kilogram of expected load is a reasonable starting point, and more is better.
Build alignment features. Cylindrical dowel pins with a D-shaped flat prevent rotation while the joint goes together. Dovetails lock axially and do not need adhesive at all. Snap fits suit parts you want to open and close, though they need consistent clearances to work. Two or three features around the circumference beat one, because a single pin lets the assembly pivot.
Set deliberate clearance. Aim for 0.15 to 0.30 mm per side on pins and sockets, and print a small coupon at the same time to check fit before committing to a long print. For a glued joint you can take the low end or even a light interference, since the adhesive fills small gaps. For a dry-fit mechanical joint, stay at the upper end.
Respect layer direction. Printed plastic is far weaker across layers than along them, and any load that tries to peel the part apart at the seam is pulling on the weakest plane. Run the cut line so it does not line up with a layer boundary, and add a small fillet or chamfer at the inside corner so the stress has somewhere to go.
Also think about tooling access. If you will need to drive a screw, clamp, or iron after assembly, the joint has to open up to the tools. A hidden lap joint with no access is a joint you cannot assemble.
3. Clean and Mechanically Prepare the Surfaces
Adhesives and solvents fail at the interface, not in their own bulk. An oily or glossy mating face is the most common reason a joint peels apart later, and no amount of extra clamp pressure will fix it.
Wipe both mating faces with isopropyl alcohol and let them dry fully. If the faces are shiny extruded plastic, scuff them with 180 to 220 grit to give the adhesive something to grip, then knock off the dust with more alcohol. Finish with 400 to 600 grit if the seam needs to disappear under paint.
For solvent welding ABS and ASA, go the other way. You want a smooth, clean, un-oiled face, lightly abraded if it has been handled a lot, and you want the solvent applied to both halves so it wicks into each side and fuses them together.
For resin prints, cure the parts fully first, then wet-sand the bonding face to 400 grit and rinse. Uncured resin surfaces are slippery and will not bond properly. Wear nitrile gloves, and wet-sand outdoors or with local extraction.
Then dry-fit the halves without any adhesive. If the faces rock or slide, stop and fix the flatness with a sanding block and a straightedge, not with more glue. Wear the mating surfaces down with 180 grit until the seam gap is consistent all the way around.
4. Make the Joint
Clamp the two halves onto the sacrificial board, line up the alignment features, and check the fit from two different angles before anything goes on. Once the glue is applied, you often get one chance at alignment.
For epoxy: mix equal volumes, work the resin into the scuffed face, apply a thin even bead or spread it with a plastic card, then seat the halves. Clamp and leave it for the full cure listed on the tube, which for most household epoxies is 24 hours before load. Do not trust the “set in five minutes” line. That is surface skin, not full strength.
For solvent welding: apply plastic cement to both faces, let it get tacky, seat the parts, and clamp until the part is cool to the touch. Followers on r/3Dprinting describe exactly this: a small swab of solvent around the mating faces, then clamp. The solvent wicks into the surface and forms a bond that is stronger than the printed material right next to it.
For plastic welding: tack the halves with a few spot welds from a soldering iron, then run slowly along the joint melting a continuous bead. The spot welds hold the alignment while you work, and the bead is what fuses the two surfaces. Let it cool fully, then sand or plane the bead back level. Keep the iron moving, and keep it away from cyanoacrylate, which fumes badly when heated.
For heat staking: seat the parts so the stakes enter the slots, then apply heat to each stake in turn until it mushrooms and flattens. Work from one end to the other so the assembly cannot shift as the earlier stakes cool and shrink.
For mechanical fastening: assemble with washers under the bolt heads, and tighten in a star pattern so the faces pull down evenly. Over-tightening crushes thin printed walls, so snug is enough.
Give the assembly the full cure time with the clamps on. If the parts have a lot of thermal mass, add another 20 minutes so the core has actually cooled, not just the surface.
5. Verify Alignment and Bond Strength
Check alignment before you remove the fixtures, because a joint that is out of position is much easier to correct while it is still clamped.
Run a straightedge across the joint in several directions and look for a light gap or a step. Sight down the length of the part and check that the surfaces either side of the seam are in the same plane. Use calipers to confirm the overall dimension is still what you designed, which tells you immediately whether the joint pulled the part out of square.
For a non-destructive bond check, push gently at the joint with a fingernail or a plastic tool and watch whether the two faces flex independently. Any give at all means the bond is not continuous. Then remove the clamps, leave the part for a further cure period if you used epoxy, and flex it gently by hand in a direction the real part is not likely to see. It should feel rigid, with no crackle and no visible movement at the seam.
For anything load-bearing, test progressively rather than all at once. Start with a hand load, then a gentle standing load, then more. If the part is a static prop, do not test beyond what it will actually carry. If it is a structural part, the honest answer is to redesign it with mechanical fasteners and have the load path checked by someone qualified.
Common Mistakes
Joining dirty or oily faces. Fingerprints, release agent from the bed, and handling oils stop most adhesives dead. Wipe both faces with isopropyl alcohol immediately before applying anything, and handle the bonded edge by the outside rather than across the joint.
Using the wrong adhesive for the material. PVC cement, model airplane cement, and epoxy on PEI are all common mistakes. Acetone-based solvent weld works on ABS and ASA and does nothing on PLA or PETG. Cyanoacrylate is brittle, so avoid it on any part that will flex, take an impact, or expand and contract with temperature.
Not enough overlap. A butt joint between two flat faces has a few square centimetres of contact no matter how long the parts are. Lap the halves, add a tongue-and-groove, or insert a printed spine that ties both sections together.
Letting the parts slide while clamping. Clamps hold the parts down, not in line. A flat board, two spacers, and a stop block keep the faces registered. This one problem causes more frustration than any adhesive choice.
Over-clamping thin walls. Printed shells crack when squeezed. Use wide clamp pads, spread the load with a scrap offcut, and tighten until the joint just goes closed.
Heating plastic without ventilation. Melting ABS or ASA gives off fumes you do not want in a bedroom or a small workshop. Use extraction with a carbon filter, and open a window if there is one. The same applies to two-part epoxy with an amine hardener.
Rushing the cure. Epoxy that feels solid after an hour may still be weak inside. Respect the full cure time on the label before you clamp something heavy onto the joint or load the finished part.
Ignoring thermal expansion. A two-metre PLA panel changes length noticeably across a season of temperature swings. If the joint is rigid and captive, that stress ends up in the part, not the glue. A small amount of slip in a bolted joint, or a split made at a natural expansion point, saves you from warped panels later.
Testing past the joint’s capacity. Breaking a joint to see how strong it is tells you the joint failed, not that the test was valid. Load-test progressively, and never use a glued assembly for climbing gear, seat-belt mounts, or automotive structures.
Two habits separate people who finish large prints from people who abandon them at the assembly stage. Print a fit-test coupon with every large job so you are not discovering a bad clearance after 30 hours of printing. And print each section flat on the bed with a brim, even when the model looks awkward that way, because a warped mating face is far more expensive than the extra filament.
Frequently Asked Questions
What is the best way to join large 3D prints made from PLA or PETG?
Two-part epoxy is the strongest all-round answer for PLA and PETG, applied to scuffed, alcohol-cleaned faces and clamped until fully cured. A plastic welding pen or soldering iron bead is the alternative when you want the seam to sand flush with the surrounding surface. Avoid super glue on parts that flex; it bonds well on rigid flat faces but cracks under movement.
Can large 3D-printed parts be joined without glue or welding?
Yes, and for load-bearing work this is the better route. Design a dovetail, tongue-and-groove, or snap fit joint, or print a captive nut and use a machine screw. Heat staking is the adhesive-free middle ground: printed posts on one half melt into tabs on the other, giving a strong mechanical lock with no chemicals involved at all.
How much overlap do I need when joining two 3D-printed parts?
As much as you can practically fit. A butt joint with no overlap is the weakest option, so lap the sections so they share a wide face, or add a tongue-and-groove. As a rough starting point, aim for around 25 square centimetres of bonding area per kilogram of expected load, and increase it if the load path runs across the joint rather than parallel to it.
How do I reinforce a weak 3D-printed joint?
Add a printed gusset or spine that bridges both halves, or route thin filament strands along the joint and melt them in with a soldering iron to build a fillet. Epoxy applied to a properly scuffed surface is stronger than a joint tightened with extra clamp pressure. If the parts flex at the seam, no adhesive will fix it; the geometry needs more overlap or a mechanical fastener.
Can you join resin prints with the same methods as plastic filament prints?
Not quite. Resin needs fully post-cured surfaces, and the bonding face should be wet-sanded to around 400 grit and rinsed, because cured resin skin is slippery and slippery surfaces will not bond. Epoxy and two-part acrylic-style cement work well. Heat welding does not apply, since resin does not melt like a thermoplastic, and solvent welding is not a sensible option either.
How long should a joined 3D print cure or cool before use?
Cyanoacrylate grips in seconds and reaches full strength in a few hours. Most two-part epoxies need 24 hours before load, even when they feel solid after an hour. Solvent-welded joints are ready once the part is cool to the touch, usually 10 to 15 minutes. Heat-welded joints need a full cool-down, about 20 extra minutes, before sanding.
Conclusion
When you sit down to join large 3D prints into one piece, four things decide the result. Identify the filament first, because it narrows the method to one or two realistic options. Give the joint real overlap and at least one alignment feature, with 0.15 to 0.30 mm clearance on pins. Clean and scuff both mating faces right before bonding, then clamp against a flat board so nothing can slide.
Start at the modelling stage, not the glue bottle. A well-designed joint with plain cyanoacrylate beats a badly designed one with the best epoxy on the shelf, and printing a small fit-test coupon costs you ten minutes and saves you a wasted 30-hour print.